
ในบทความก่อน ผมได้แนะนำให้ทุกคนได้รู้จักกับ Haystack 2.0 ซึ่งเป็น package สำหรับสร้าง LLM (large language model) application ใน Python
ในบทความนี้ ผมจะมาแนะนำการใช้ Haystack 2.0 ในการทำ RAG (Retrieval-Augmented Generation) pipeline ซึ่งเป็นการใช้งานหลักของ Haystack 2.0
ถ้าพร้อมแล้ว ไปเริ่มกันเลย
🤨 What Is RAG?
RAG เป็นเทคนิคที่ช่วยให้ LLM ตอบคำถามได้ดีขึ้น โดยส่งเอกสารที่เกี่ยวข้องไปให้ LLM สร้างคำตอบ
RAG pipeline ประกอบด้วย 2 ส่วน:
- Indexing pipeline: จัดเตรียมเอกสาร
- Querying pipeline: ค้นหาเอกสารและเขียนคำตอบ
Pipeline 1. Indexing pipeline:
Documents ↓Split Documents into chunks ↓Embed chunks into vectors ↓Write Documents to vector store
Pipeline 2. Querying pipeline:
Query ↓Embed query ↓Retrieve relevant chunks from vector store ↓Add retrieved chunks to prompt ↓Send prompt to LLM ↓Return answer
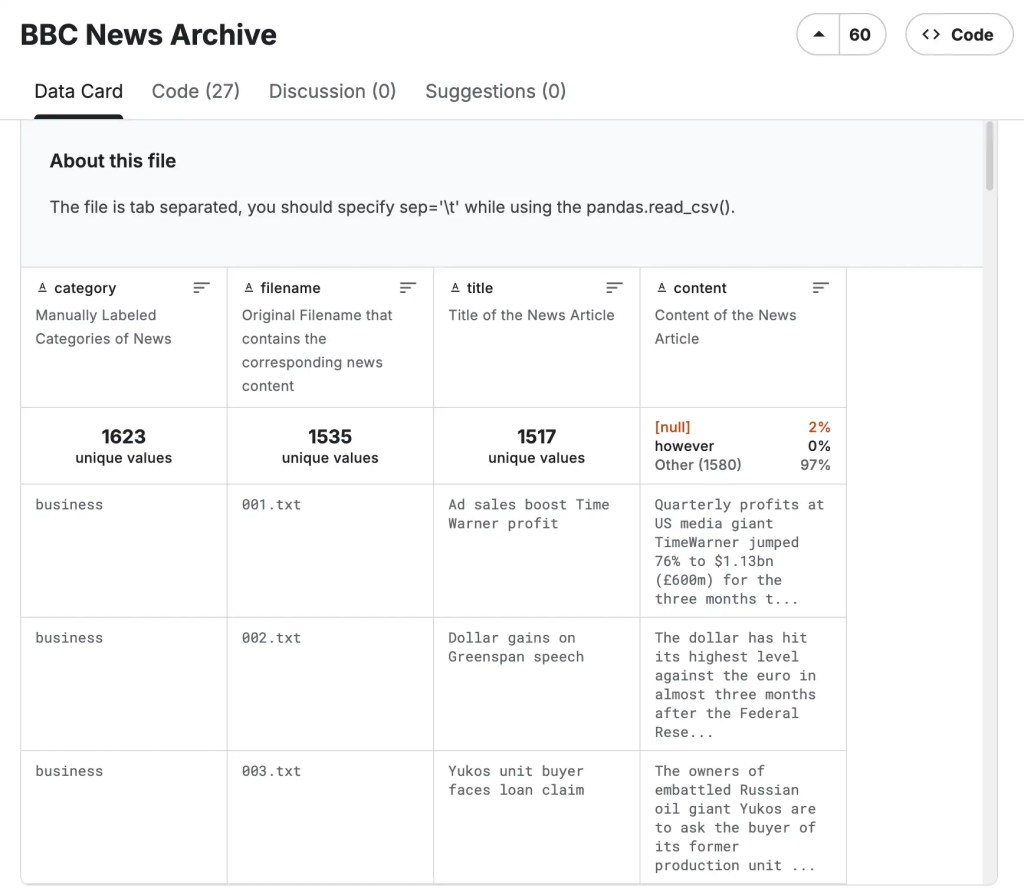
เราไปดูการสร้างแต่ละส่วนด้วย Haystack 2.0 กัน ผ่านตัวอย่างการสร้างบอทตอบคำถามข่าวจาก BBC News Archive dataset กัน
🗂️ Pipeline 1. Indexing
Indexing pipeline มี 5 ส่วนประกอบ:
- Documents: เอกสารต้นทาง
- Splitter: แยกเอกสาร
- Embedder: แปลงเอกสารให้เป็น vector
- Vector store: ตัวจัดเก็บ vector
- Writer: ส่ง vector ไปเก็บที่ vector store
และเราสามารถสร้าง pipeline ได้ใน 7 ขั้นตอน:
- Create Documents
- Create a splitter
- Create an embedder
- Create a vector store
- Create a document writer
- Create an indexing pipeline
- Run the pipeline
ไปดูการเขียน code ในแต่ละขั้นตอนกัน
.
1️⃣ Step 1. Create Documents
ในขั้นแรก เราจะสร้าง Document object หรือเอกสารที่จะใส่เข้าไปใน RAG pipeline
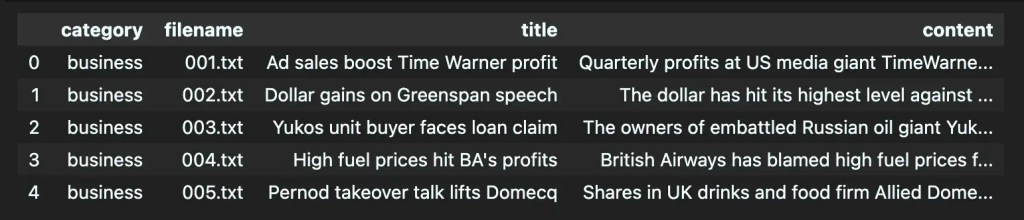
ในตัวอย่าง เราจะโหลดเอกสารที่เก็บไว้ในไฟล์ CSV แบบนี้:
# Import the packageimport pandas as pd# Load the CSVdf = pd.read_csv("bbc-news-data.csv", sep="\t")# Inspect the first 5 rowsdf.head(5)
ผลลัพธ์:
และแปลงให้เป็น Document object แบบนี้:
# Import the packagefrom haystack import Document# Instantiate a collectordocs = []# Loop through the recordsfor row in df.itertuples(): doc = Document( content=row.content, meta={ "title": row.title, "category": row.category, "filename": row.filename } ) docs.append(doc) # Inspect one Documentdocs[0]
ผลลัพธ์:
Document(id=7fe87ca8e57420adb9ed47866809d38424003dd43b4eefdf6b1a400eb3709677, content: ' Quarterly profits at US media giant TimeWarner jumped 76% to $1.13bn (£600m) for the three months t...', meta: {'title': 'Ad sales boost Time Warner profit', 'category': 'business', 'filename': '001.txt'})
.
2️⃣ Step 2. Create a Splitter
ในขั้นที่ 2 เราจะสร้าง splitter ที่จะแยกเอกสารออกเป็นก้อน ๆ หรือ chunk ซึ่งจะทำให้ค้นหาเอกสารได้ดีขึ้น
Splitter มีหลายประเภท:
| Splitter | Split Method |
|---|---|
DocumentSplitter() | แบ่งตามคำ บรรทัด ย่อหน้า หรือหน้า |
ChonkieTokenDocumentSplitter() | แบ่งตามจำนวน token |
RecursiveDocumentSplitter() | แบ่งตาม list ที่เรากำหนด |
ในตัวอย่าง เราจะใช้ RecursiveDocumentSplitter() กัน:
# Import the packagefrom haystack.components.preprocessors import RecursiveDocumentSplitter# Create a splittersplitter = RecursiveDocumentSplitter( split_length=180, split_overlap=30, split_unit="word", separators=[ "\n\n", "sentence", "\n", " ", ])
.
3️⃣ Step 3. Create Embedder
ในขั้นที่ 3 เราจะสร้าง embedder ที่จะเปลี่ยน chunk ให้เป็น vector หรือตัวเลขที่ใช้ค้นหาเอกสารใน RAG pipeline
ตัวอย่าง chunk:
British Airways has blamed high fuel prices ...
ตัวอย่าง vector:
[ -0.0312, 0.0847, -0.0129, 0.0455, 0.0068, -0.0974, 0.0381, 0.0616, -0.0442, 0.0193, ...]
RAG pipeline จะใช้ vector ในการค้นหาเอกสารที่เกี่ยวข้อง โดยเอกสารและคำถามที่มี vector คล้ายกันก็ยิ่งมีเนื้อหาที่เกี่ยวข้องกัน
เช่น “ข่าวเทคโนโลยี” จะมี vector ที่ใกล้เคียงกับหัวข่าว “Apple เปิดตัว iPhone รุ่นใหม่” มากกว่า “ผลบอลพรีเมียร์ลีกเมื่อคืนนี้”
ในตัวอย่าง เราจะใช้ embedder ชื่อ Sentence Transformers จาก HuggingFace กัน:
# Import the packagefrom haystack_integrations.components.embedders.sentence_transformers import ( SentenceTransformersDocumentEmbedder)# Create a document embedderdocument_embedder = SentenceTransformersDocumentEmbedder( model="sentence-transformers/all-MiniLM-L6-v2", meta_fields_to_embed=["title"],)
.
4️⃣ Step 4. Create a Vector Store
ในขั้นที่ 4 เราจะสร้าง vector store สำหรับจัดเก็บเอกสารและ vector กัน
ในตัวอย่าง เราจะสร้าง vector store ชั่วคราวบนเครื่องแบบนี้:
# Import the packagefrom haystack.document_stores.in_memory import InMemoryDocumentStore# Create a vector storevector_store = InMemoryDocumentStore( embedding_similarity_function="cosine")
.
5️⃣ Step 5. Create a Document Writer
ในขั้นที่ 5 เราจะสร้าง document writer ที่จะส่งเอกสารไปเก็บใน vector store:
# Import the packagefrom haystack.components.writers import DocumentWriter# Create a document writerdocument_writer = DocumentWriter( document_store=vector_store)
.
6️⃣ Step 6. Create an Indexing Pipeline
ในขั้นที่ 6 เราจะเชื่อมต่อส่วนต่าง ๆ เข้าด้วยกัน
เริ่มจากสร้าง Pipeline object:
# Import the packagefrom haystack import Pipeline# Instantiate a Pipeline objectindexing_pipeline = Pipeline()
เพิ่มส่วนประกอบ โดยกำหนดชื่อและตัวแปร:
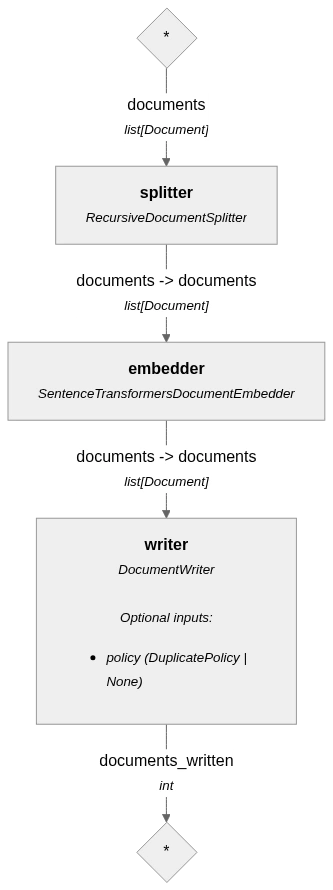
# Add the componentsindexing_pipeline.add_component("splitter", splitter)indexing_pipeline.add_component("embedder", document_embedder)indexing_pipeline.add_component("writer", document_writer)
แล้วเชื่อมส่วนประกอบเข้าด้วยกัน โดยกำหนดว่า แต่ละส่วนประกอบจะส่งและรับอะไรจากกันบ้าง:
pipeline.connect("sender.output", "receiver.input")
ตัวอย่าง:
# Connect the componentsindexing_pipeline.connect("splitter.documents", "embedder.documents")indexing_pipeline.connect("embedder.documents", "writer.documents")
สุดท้าย เราสามารถดู pipeline ที่สร้างขึ้นได้แบบนี้:
# Display the pipelineindexing_pipeline.show()
ผลลัพธ์:
.
7️⃣ Step 7. Run the Pipeline
ในขั้นสุดท้าย เราจะรัน pipeline เพื่อเอาเอกสารเข้าไปเก็บใน vector store:
# Run the indexing pipelineindexing_result = indexing_pipeline.run( { "splitter": { "documents": docs } })# Display the resultprint(indexing_result)
ผลลัพธ์:
{'writer': {'documents_written': 7182}}
เท่านี้ เราก็มี indexing pipeline ไว้ใช้งานแล้ว
🔍 Pipeline 2. Querying
Querying pipeline มี 4 ส่วนประกอบ:
- Query embedder: แปลงคำถามเป็น vector
- Retriever: ค้นหาเอกสารที่เกี่ยวข้อง
- Prompt builder: สร้าง prompt
- Response generator: เขียนคำตอบ
และเราสามารถสร้างและประกอบทั้ง 4 อย่างเข้าด้วยกันได้ใน 6 ขั้นตอน:
- Create a query embedder
- Create a retriever
- Create a prompt builder
- Create a response generator
- Create a querying pipeline
- Run the pipeline
.
1️⃣ Step 1. Create a Query Embedder
ในขั้นแรก เราจะสร้าง embedder ที่จะเปลี่ยนคำถามของผู้ใช้งานให้เป็น vector ที่เราจะใช้ค้นหาเอกสารที่เกี่ยวข้องได้:
# Import the packagefrom haystack_integrations.components.embedders.sentence_transformers import ( SentenceTransformersTextEmbedder)# Create a question embedderquestion_embedder = SentenceTransformersTextEmbedder( model="sentence-transformers/all-MiniLM-L6-v2")
.
2️⃣ Step 2. Create a Retriever
ในขั้นที่ 2 เราจะสร้าง retriever หรือตัวค้นหาเอกสารที่เกี่ยวข้องใน vector store:
# Import the packagefrom haystack.components.retrievers.in_memory import InMemoryEmbeddingRetriever# Create a retrieverretriever = InMemoryEmbeddingRetriever( document_store=vector_store, top_k=5)
.
3️⃣ Step 3. Create a Prompt Builder
ในขั้นที่ 3 เราจะสร้าง prompt builder ที่จะประกอบ prompt ที่จะส่งไปให้ LLM เพื่อตอบคำถาม
เราจะเริ่มจากกำหนด system prompt ที่จะกำหนดพฤติกรรมการตอบคำถาม:
# Set the system promptsystem_prompt = """You are a helpful assistant for a historical BBC News Archive.Answer only from the retrieved BBC article passages.Rules:- Be concise.- Do not use outside knowledge.- Do not invent facts that are not supported by the passages.- The archive is historical, so do not present its content as current news.- Cite factual claims using source labels such as [1] or [2].- If the retrieved passages do not contain enough evidence, say that clearly.- Response in short bullet points.- At the end of the answer, include a "Sources:" section listing only the sources that were actually cited in the answer. Format each source as: - [n] <Title>"""
และ user prompt ที่จะส่งเอกสารที่เกี่ยวข้องกับคำถามของผู้ใช้งานไปให้กับ LLM:
# Set the user promptuser_prompt = """Question:{{ question }}Retrieved BBC archive passages:{% for doc in docs %}[{{ loop.index }}]Title: {{ doc.meta["title"] }}Category: {{ doc.meta["category"] }}Filename: {{ doc.meta["filename"] }}Passage:{{ doc.content }}{% endfor %}Write a concise answer using only the retrieved passages.After the answer, include:Sources:{% raw %}- [n] <Title>{% endraw %}where each title corresponds to the cited passage, and list only the sources that were actually cited in the answer."""
สังเกตว่า เราใช้ Jinja syntax (การเขียน {{}} และ {}) เพื่อทำให้เราแทนที่เอกสารลงไปในตัวแปรใน prompt ได้
หลังจากกำหนด system และ user prompt แล้ว เราจะสร้าง prompt builder แบบนี้:
# Import the packagesfrom haystack.components.builders import ChatPromptBuilderfrom haystack.dataclasses import ChatMessage# Create a prompt builderprompt_builder = ChatPromptBuilder( template=[ ChatMessage.from_system(system_prompt.strip()), ChatMessage.from_user(user_prompt.strip()) ], required_variables=["question", "docs"],)
.
4️⃣ Step 4. Create a Response Generator
ในขั้นที่ 4 เราจะสร้าง response generator หรือ LLM ที่จะตอบคำถามขึ้นมา
เริ่มจากกำหนด API key:
# Import the packagesimport osfrom dotenv import load_dotenv# Load the .env contentload_dotenv()# Get the API keyGEMINI_API_KEY = os.getenv("GEMINI_API_KEY")
และสร้าง response generator:
# Import the packagesfrom haystack.utils import Secretfrom haystack_integrations.components.generators.google_genai import ( GoogleGenAIChatGenerator)# Create a generatorgenerator = GoogleGenAIChatGenerator( model="gemini-2.5-flash", api_key=Secret.from_token(GEMINI_API_KEY), generation_kwargs={ "temperature": 0.2 })
.
5️⃣ Step 5. Create a Pipeline
ในขั้นที่ 5 เราจะเชื่อมต่อทุกส่วนใน querying pipeline เข้าด้วยกัน โดยใช้วิธีเดียวกันกับ indexing pipeline
สร้าง Pipeline object:
# Import the packagefrom haystack import Pipeline# Instantiate a Pipeline objectquerying_pipeline = Pipeline()
เพิ่มส่วนประกอบ:
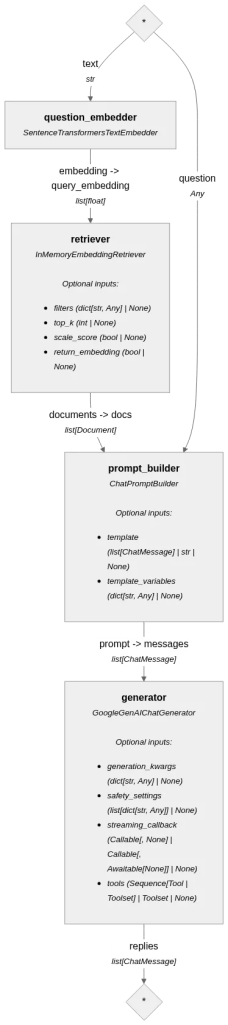
# Add the componentsquerying_pipeline.add_component("question_embedder", question_embedder)querying_pipeline.add_component("retriever", retriever)querying_pipeline.add_component("prompt_builder", prompt_builder)querying_pipeline.add_component("generator", generator)
เชื่อมส่วนประกอบเข้าด้วยกัน:
# Connect the componentsquerying_pipeline.connect("question_embedder.embedding", "retriever.query_embedding")querying_pipeline.connect("retriever.documents", "prompt_builder.docs")querying_pipeline.connect("prompt_builder.prompt", "generator.messages")
ดู pipeline ที่สร้างขึ้นมา:
# Display the pipelinequerying_pipeline.show()
ผลลัพธ์:
.
6️⃣ Step 6. Run the Pipeline
ในขั้นสุดท้าย เราจะเรียกใช้งาน querying pipeline กัน
เริ่มจากสร้าง function สำหรับเรียกใช้งาน pipeline เพื่อให้ง่ายต่อการเรียกใช้:
# Create the functiondef run_query(query: str): # Run the pipeline result = querying_pipeline.run( { "question_embedder": { "text": query }, "prompt_builder": { "question": query } } ) # Return the result return result["generator"]["replies"][0].text
จากนั้น เรียกใช้งานโดยถามเกี่ยวกับข่าวที่อยู่ใน BBC News Archive เช่น:
# Set the questionmy_question = "What concerns did users raise about Google’s AutoLink feature?"# Run the queryquery_result = run_query(query=my_question)# Display the resultprint(query_result)
ผลลัพธ์:
Users raised several concerns about Google’s AutoLink feature:* It directs people to pre-selected commercial websites [1].* Google's dominant market position could give a competitive edge to firms like Amazon [1].* It creates links based on webpage information without the publisher's permission [1].* Online libraries and other websites might direct users to commercial sites like Amazon or rival services against their will or in conflict with their own advertising [4].* Some users felt it would only be fair if websites had to opt-in or receive revenue for "click throughs" to commercial sites [2].* Concerns were raised about user choice, transparency regarding Google's payments, and the ability to substitute preferred companies for those chosen by Google [3].* There was an objection to users being forced or tricked into using the service [3].* The feature was compared to Microsoft's Smart Tags, which was widely criticised [2].Sources:- [1] Google's toolbar sparks concern- [2] Google's toolbar sparks concern- [3] Google's toolbar sparks concern- [4] Google's toolbar sparks concern
💪 Summary
RAG pipeline ใน Haystack 2.0 ประกอบด้วย 2 ส่วน ซึ่งสร้างได้แบบนี้:
Pipeline 1. Indexing pipeline:
- Create Documents
- Create a splitter
- Create an embedder
- Create a vector store
- Create a document writer
- Create a pipeline
- Run the pipeline
Pipeline 2. Querying pipeline:
- Create a query embedder
- Create a retriever
- Create a prompt builder
- Create a response generator
- Create a querying pipeline
- Run the pipeline
⏭️ Next
หลังอ่านบทความจบแล้ว ลองมาใช้ Haystack 2.0 กันดูนะครับ:
- ดูตัวอย่าง dataset และ code ในบทความนี้
- ดูวิธีสร้าง LLM application ด้วย Haystack 2.0
- ดูคู่มือการใช้งาน Haystack 2.0

 Shi no Shigoto