Tag: RAG

  • วิธีสร้าง RAG Pipeline ด้วย Haystack 2.0 ใน Python

    วิธีสร้าง RAG Pipeline ด้วย Haystack 2.0 ใน Python

    ในบทความก่อน ผมได้แนะนำให้ทุกคนได้รู้จักกับ Haystack 2.0 ซึ่งเป็น package สำหรับสร้าง LLM (large language model) application ใน Python

    ในบทความนี้ ผมจะมาแนะนำการใช้ Haystack 2.0 ในการทำ RAG (Retrieval-Augmented Generation) pipeline ซึ่งเป็นการใช้งานหลักของ Haystack 2.0

    ถ้าพร้อมแล้ว ไปเริ่มกันเลย


    🤨 What Is RAG?

    RAG เป็นเทคนิคที่ช่วยให้ LLM ตอบคำถามได้ดีขึ้น โดยส่งเอกสารที่เกี่ยวข้องไปให้ LLM สร้างคำตอบ

    RAG pipeline ประกอบด้วย 2 ส่วน:

    1. Indexing pipeline: จัดเตรียมเอกสาร
    2. Querying pipeline: ค้นหาเอกสารและเขียนคำตอบ

    Pipeline 1. Indexing pipeline:

    Documents
    Split Documents into chunks
    Embed chunks into vectors
    Write Documents to vector store

    Pipeline 2. Querying pipeline:

    Query
    Embed query
    Retrieve relevant chunks from vector store
    Add retrieved chunks to prompt
    Send prompt to LLM
    Return answer

    เราไปดูการสร้างแต่ละส่วนด้วย Haystack 2.0 กัน ผ่านตัวอย่างการสร้างบอทตอบคำถามข่าวจาก BBC News Archive dataset กัน

    🗂️ Pipeline 1. Indexing

    Indexing pipeline มี 5 ส่วนประกอบ:

    1. Documents: เอกสารต้นทาง
    2. Splitter: แยกเอกสาร
    3. Embedder: แปลงเอกสารให้เป็น vector
    4. Vector store: ตัวจัดเก็บ vector
    5. Writer: ส่ง vector ไปเก็บที่ vector store

    และเราสามารถสร้าง pipeline ได้ใน 7 ขั้นตอน:

    1. Create Documents
    2. Create a splitter
    3. Create an embedder
    4. Create a vector store
    5. Create a document writer
    6. Create an indexing pipeline
    7. Run the pipeline

    ไปดูการเขียน code ในแต่ละขั้นตอนกัน

    .

    1️⃣ Step 1. Create Documents

    ในขั้นแรก เราจะสร้าง Document object หรือเอกสารที่จะใส่เข้าไปใน RAG pipeline

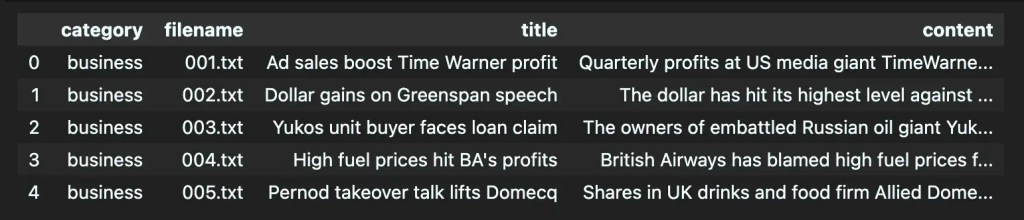
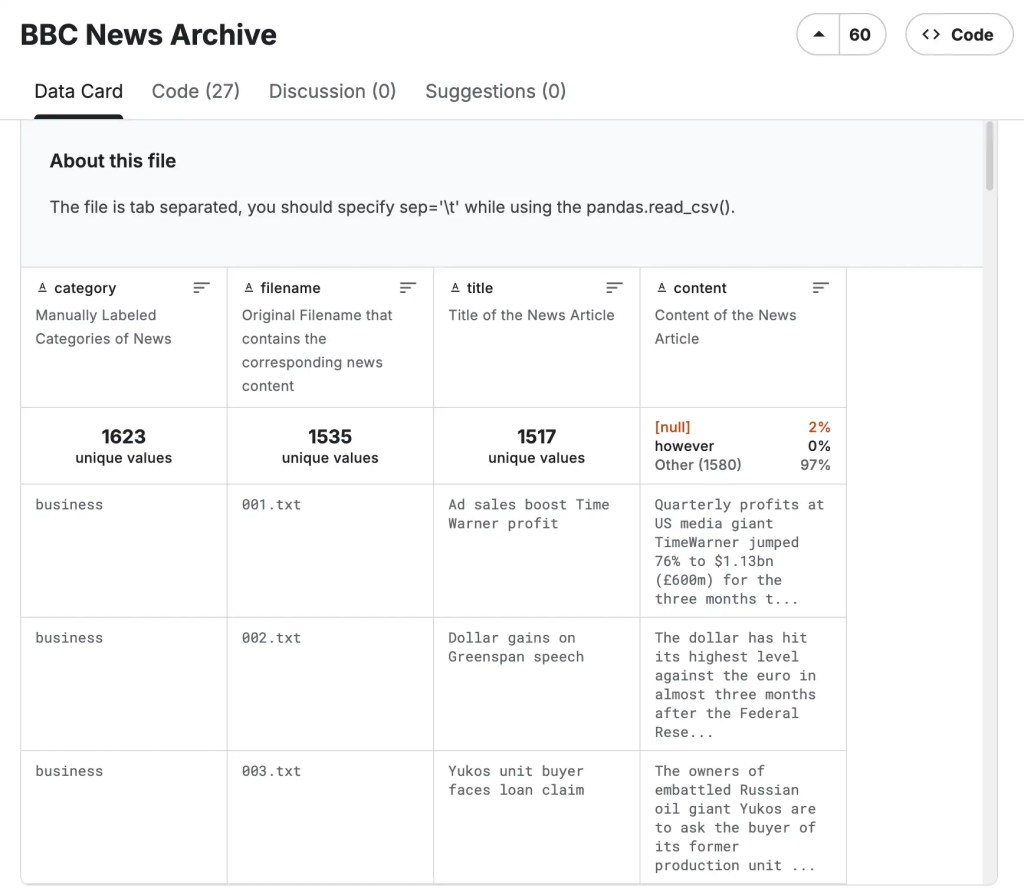
    ในตัวอย่าง เราจะโหลดเอกสารที่เก็บไว้ในไฟล์ CSV แบบนี้:

    Python
    # Import the package
    import pandas as pd
    # Load the CSV
    df = pd.read_csv("bbc-news-data.csv", sep="\t")
    # Inspect the first 5 rows
    df.head(5)

    ผลลัพธ์:

    และแปลงให้เป็น Document object แบบนี้:

    Python
    # Import the package
    from haystack import Document
    # Instantiate a collector
    docs = []
    # Loop through the records
    for row in df.itertuples():
    doc = Document(
    content=row.content,
    meta={
    "title": row.title,
    "category": row.category,
    "filename": row.filename
    }
    )
    docs.append(doc)
    # Inspect one Document
    docs[0]

    ผลลัพธ์:

    Document(id=7fe87ca8e57420adb9ed47866809d38424003dd43b4eefdf6b1a400eb3709677, content: ' Quarterly profits at US media giant TimeWarner jumped 76% to $1.13bn (£600m) for the three months t...', meta: {'title': 'Ad sales boost Time Warner profit', 'category': 'business', 'filename': '001.txt'})

    .

    2️⃣ Step 2. Create a Splitter

    ในขั้นที่ 2 เราจะสร้าง splitter ที่จะแยกเอกสารออกเป็นก้อน ๆ หรือ chunk ซึ่งจะทำให้ค้นหาเอกสารได้ดีขึ้น

    Splitter มีหลายประเภท:

    SplitterSplit Method
    DocumentSplitter()แบ่งตามคำ บรรทัด ย่อหน้า หรือหน้า
    ChonkieTokenDocumentSplitter()แบ่งตามจำนวน token
    RecursiveDocumentSplitter()แบ่งตาม list ที่เรากำหนด

    ในตัวอย่าง เราจะใช้ RecursiveDocumentSplitter() กัน:

    Python
    # Import the package
    from haystack.components.preprocessors import RecursiveDocumentSplitter
    # Create a splitter
    splitter = RecursiveDocumentSplitter(
    split_length=180,
    split_overlap=30,
    split_unit="word",
    separators=[
    "\n\n",
    "sentence",
    "\n",
    " ",
    ]
    )

    .

    3️⃣ Step 3. Create Embedder

    ในขั้นที่ 3 เราจะสร้าง embedder ที่จะเปลี่ยน chunk ให้เป็น vector หรือตัวเลขที่ใช้ค้นหาเอกสารใน RAG pipeline

    ตัวอย่าง chunk:

    British Airways has blamed high fuel prices ...

    ตัวอย่าง vector:

    [
    -0.0312,
    0.0847,
    -0.0129,
    0.0455,
    0.0068,
    -0.0974,
    0.0381,
    0.0616,
    -0.0442,
    0.0193,
    ...
    ]

    RAG pipeline จะใช้ vector ในการค้นหาเอกสารที่เกี่ยวข้อง โดยเอกสารและคำถามที่มี vector คล้ายกันก็ยิ่งมีเนื้อหาที่เกี่ยวข้องกัน

    เช่น “ข่าวเทคโนโลยี” จะมี vector ที่ใกล้เคียงกับหัวข่าว “Apple เปิดตัว iPhone รุ่นใหม่” มากกว่า “ผลบอลพรีเมียร์ลีกเมื่อคืนนี้”

    ในตัวอย่าง เราจะใช้ embedder ชื่อ Sentence Transformers จาก HuggingFace กัน:

    Python
    # Import the package
    from haystack_integrations.components.embedders.sentence_transformers import (
    SentenceTransformersDocumentEmbedder
    )
    # Create a document embedder
    document_embedder = SentenceTransformersDocumentEmbedder(
    model="sentence-transformers/all-MiniLM-L6-v2",
    meta_fields_to_embed=["title"],
    )

    .

    4️⃣ Step 4. Create a Vector Store

    ในขั้นที่ 4 เราจะสร้าง vector store สำหรับจัดเก็บเอกสารและ vector กัน

    ในตัวอย่าง เราจะสร้าง vector store ชั่วคราวบนเครื่องแบบนี้:

    Python
    # Import the package
    from haystack.document_stores.in_memory import InMemoryDocumentStore
    # Create a vector store
    vector_store = InMemoryDocumentStore(
    embedding_similarity_function="cosine"
    )

    .

    5️⃣ Step 5. Create a Document Writer

    ในขั้นที่ 5 เราจะสร้าง document writer ที่จะส่งเอกสารไปเก็บใน vector store:

    Python
    # Import the package
    from haystack.components.writers import DocumentWriter
    # Create a document writer
    document_writer = DocumentWriter(
    document_store=vector_store
    )

    .

    6️⃣ Step 6. Create an Indexing Pipeline

    ในขั้นที่ 6 เราจะเชื่อมต่อส่วนต่าง ๆ เข้าด้วยกัน

    เริ่มจากสร้าง Pipeline object:

    Python
    # Import the package
    from haystack import Pipeline
    # Instantiate a Pipeline object
    indexing_pipeline = Pipeline()

    เพิ่มส่วนประกอบ โดยกำหนดชื่อและตัวแปร:

    Python
    # Add the components
    indexing_pipeline.add_component("splitter", splitter)
    indexing_pipeline.add_component("embedder", document_embedder)
    indexing_pipeline.add_component("writer", document_writer)

    แล้วเชื่อมส่วนประกอบเข้าด้วยกัน โดยกำหนดว่า แต่ละส่วนประกอบจะส่งและรับอะไรจากกันบ้าง:

    pipeline.connect("sender.output", "receiver.input")

    ตัวอย่าง:

    Python
    # Connect the components
    indexing_pipeline.connect("splitter.documents", "embedder.documents")
    indexing_pipeline.connect("embedder.documents", "writer.documents")

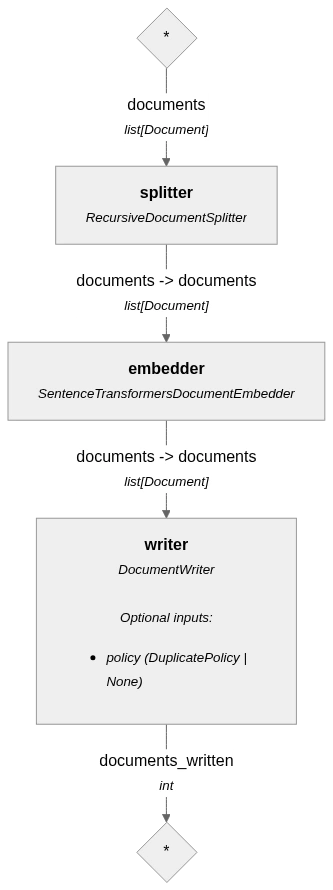
    สุดท้าย เราสามารถดู pipeline ที่สร้างขึ้นได้แบบนี้:

    Python
    # Display the pipeline
    indexing_pipeline.show()

    ผลลัพธ์:

    .

    7️⃣ Step 7. Run the Pipeline

    ในขั้นสุดท้าย เราจะรัน pipeline เพื่อเอาเอกสารเข้าไปเก็บใน vector store:

    Python
    # Run the indexing pipeline
    indexing_result = indexing_pipeline.run(
    {
    "splitter": {
    "documents": docs
    }
    }
    )
    # Display the result
    print(indexing_result)

    ผลลัพธ์:

    {'writer': {'documents_written': 7182}}

    เท่านี้ เราก็มี indexing pipeline ไว้ใช้งานแล้ว


    🔍 Pipeline 2. Querying

    Querying pipeline มี 4 ส่วนประกอบ:

    1. Query embedder: แปลงคำถามเป็น vector
    2. Retriever: ค้นหาเอกสารที่เกี่ยวข้อง
    3. Prompt builder: สร้าง prompt
    4. Response generator: เขียนคำตอบ

    และเราสามารถสร้างและประกอบทั้ง 4 อย่างเข้าด้วยกันได้ใน 6 ขั้นตอน:

    1. Create a query embedder
    2. Create a retriever
    3. Create a prompt builder
    4. Create a response generator
    5. Create a querying pipeline
    6. Run the pipeline

    .

    1️⃣ Step 1. Create a Query Embedder

    ในขั้นแรก เราจะสร้าง embedder ที่จะเปลี่ยนคำถามของผู้ใช้งานให้เป็น vector ที่เราจะใช้ค้นหาเอกสารที่เกี่ยวข้องได้:

    Python
    # Import the package
    from haystack_integrations.components.embedders.sentence_transformers import (
    SentenceTransformersTextEmbedder
    )
    # Create a question embedder
    question_embedder = SentenceTransformersTextEmbedder(
    model="sentence-transformers/all-MiniLM-L6-v2"
    )

    .

    2️⃣ Step 2. Create a Retriever

    ในขั้นที่ 2 เราจะสร้าง retriever หรือตัวค้นหาเอกสารที่เกี่ยวข้องใน vector store:

    Python
    # Import the package
    from haystack.components.retrievers.in_memory import InMemoryEmbeddingRetriever
    # Create a retriever
    retriever = InMemoryEmbeddingRetriever(
    document_store=vector_store,
    top_k=5
    )

    .

    3️⃣ Step 3. Create a Prompt Builder

    ในขั้นที่ 3 เราจะสร้าง prompt builder ที่จะประกอบ prompt ที่จะส่งไปให้ LLM เพื่อตอบคำถาม

    เราจะเริ่มจากกำหนด system prompt ที่จะกำหนดพฤติกรรมการตอบคำถาม:

    Python
    # Set the system prompt
    system_prompt = """
    You are a helpful assistant for a historical BBC News Archive.
    Answer only from the retrieved BBC article passages.
    Rules:
    - Be concise.
    - Do not use outside knowledge.
    - Do not invent facts that are not supported by the passages.
    - The archive is historical, so do not present its content as current news.
    - Cite factual claims using source labels such as [1] or [2].
    - If the retrieved passages do not contain enough evidence, say that clearly.
    - Response in short bullet points.
    - At the end of the answer, include a "Sources:" section listing only the sources that were actually cited in the answer. Format each source as:
    - [n] <Title>
    """

    และ user prompt ที่จะส่งเอกสารที่เกี่ยวข้องกับคำถามของผู้ใช้งานไปให้กับ LLM:

    Python
    # Set the user prompt
    user_prompt = """
    Question:
    {{ question }}
    Retrieved BBC archive passages:
    {% for doc in docs %}
    [{{ loop.index }}]
    Title: {{ doc.meta["title"] }}
    Category: {{ doc.meta["category"] }}
    Filename: {{ doc.meta["filename"] }}
    Passage:
    {{ doc.content }}
    {% endfor %}
    Write a concise answer using only the retrieved passages.
    After the answer, include:
    Sources:
    {% raw %}- [n] <Title>{% endraw %}
    where each title corresponds to the cited passage, and list only the sources that were actually cited in the answer.
    """

    สังเกตว่า เราใช้ Jinja syntax (การเขียน {{}} และ {}) เพื่อทำให้เราแทนที่เอกสารลงไปในตัวแปรใน prompt ได้

    หลังจากกำหนด system และ user prompt แล้ว เราจะสร้าง prompt builder แบบนี้:

    Python
    # Import the packages
    from haystack.components.builders import ChatPromptBuilder
    from haystack.dataclasses import ChatMessage
    # Create a prompt builder
    prompt_builder = ChatPromptBuilder(
    template=[
    ChatMessage.from_system(system_prompt.strip()),
    ChatMessage.from_user(user_prompt.strip())
    ],
    required_variables=["question", "docs"],
    )

    .

    4️⃣ Step 4. Create a Response Generator

    ในขั้นที่ 4 เราจะสร้าง response generator หรือ LLM ที่จะตอบคำถามขึ้นมา

    เริ่มจากกำหนด API key:

    Python
    # Import the packages
    import os
    from dotenv import load_dotenv
    # Load the .env content
    load_dotenv()
    # Get the API key
    GEMINI_API_KEY = os.getenv("GEMINI_API_KEY")

    และสร้าง response generator:

    Python
    # Import the packages
    from haystack.utils import Secret
    from haystack_integrations.components.generators.google_genai import (
    GoogleGenAIChatGenerator
    )
    # Create a generator
    generator = GoogleGenAIChatGenerator(
    model="gemini-2.5-flash",
    api_key=Secret.from_token(GEMINI_API_KEY),
    generation_kwargs={
    "temperature": 0.2
    }
    )

    .

    5️⃣ Step 5. Create a Pipeline

    ในขั้นที่ 5 เราจะเชื่อมต่อทุกส่วนใน querying pipeline เข้าด้วยกัน โดยใช้วิธีเดียวกันกับ indexing pipeline

    สร้าง Pipeline object:

    Python
    # Import the package
    from haystack import Pipeline
    # Instantiate a Pipeline object
    querying_pipeline = Pipeline()

    เพิ่มส่วนประกอบ:

    Python
    # Add the components
    querying_pipeline.add_component("question_embedder", question_embedder)
    querying_pipeline.add_component("retriever", retriever)
    querying_pipeline.add_component("prompt_builder", prompt_builder)
    querying_pipeline.add_component("generator", generator)

    เชื่อมส่วนประกอบเข้าด้วยกัน:

    Python
    # Connect the components
    querying_pipeline.connect("question_embedder.embedding", "retriever.query_embedding")
    querying_pipeline.connect("retriever.documents", "prompt_builder.docs")
    querying_pipeline.connect("prompt_builder.prompt", "generator.messages")

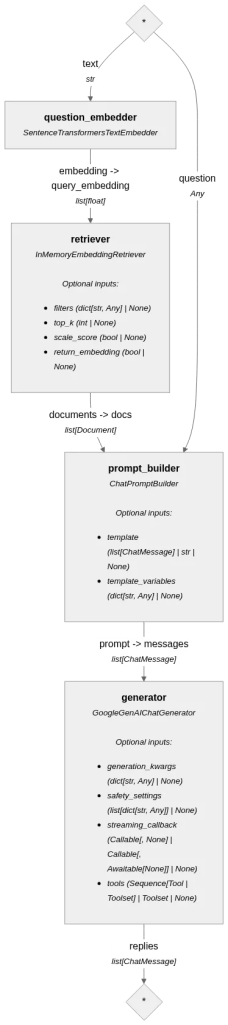
    ดู pipeline ที่สร้างขึ้นมา:

    Python
    # Display the pipeline
    querying_pipeline.show()

    ผลลัพธ์:

    .

    6️⃣ Step 6. Run the Pipeline

    ในขั้นสุดท้าย เราจะเรียกใช้งาน querying pipeline กัน

    เริ่มจากสร้าง function สำหรับเรียกใช้งาน pipeline เพื่อให้ง่ายต่อการเรียกใช้:

    Python
    # Create the function
    def run_query(query: str):
    # Run the pipeline
    result = querying_pipeline.run(
    {
    "question_embedder": {
    "text": query
    },
    "prompt_builder": {
    "question": query
    }
    }
    )
    # Return the result
    return result["generator"]["replies"][0].text

    จากนั้น เรียกใช้งานโดยถามเกี่ยวกับข่าวที่อยู่ใน BBC News Archive เช่น:

    Python
    # Set the question
    my_question = "What concerns did users raise about Google’s AutoLink feature?"
    # Run the query
    query_result = run_query(query=my_question)
    # Display the result
    print(query_result)

    ผลลัพธ์:

    Users raised several concerns about Google’s AutoLink feature:
    * It directs people to pre-selected commercial websites [1].
    * Google's dominant market position could give a competitive edge to firms like Amazon [1].
    * It creates links based on webpage information without the publisher's permission [1].
    * Online libraries and other websites might direct users to commercial sites like Amazon or rival services against their will or in conflict with their own advertising [4].
    * Some users felt it would only be fair if websites had to opt-in or receive revenue for "click throughs" to commercial sites [2].
    * Concerns were raised about user choice, transparency regarding Google's payments, and the ability to substitute preferred companies for those chosen by Google [3].
    * There was an objection to users being forced or tricked into using the service [3].
    * The feature was compared to Microsoft's Smart Tags, which was widely criticised [2].
    Sources:
    - [1] Google's toolbar sparks concern
    - [2] Google's toolbar sparks concern
    - [3] Google's toolbar sparks concern
    - [4] Google's toolbar sparks concern

    💪 Summary

    RAG pipeline ใน Haystack 2.0 ประกอบด้วย 2 ส่วน ซึ่งสร้างได้แบบนี้:

    Pipeline 1. Indexing pipeline:

    1. Create Documents
    2. Create a splitter
    3. Create an embedder
    4. Create a vector store
    5. Create a document writer
    6. Create a pipeline
    7. Run the pipeline

    Pipeline 2. Querying pipeline:

    1. Create a query embedder
    2. Create a retriever
    3. Create a prompt builder
    4. Create a response generator
    5. Create a querying pipeline
    6. Run the pipeline

    ⏭️ Next

    หลังอ่านบทความจบแล้ว ลองมาใช้ Haystack 2.0 กันดูนะครับ:

    1. ดูตัวอย่าง dataset และ code ในบทความนี้
    2. ดูวิธีสร้าง LLM application ด้วย Haystack 2.0
    3. ดูคู่มือการใช้งาน Haystack 2.0

    📃 References

    Fediverse Reactions
  • วิธีสร้าง RAG Pipeline ด้วย LangChain ใน Python

    วิธีสร้าง RAG Pipeline ด้วย LangChain ใน Python

    RAG (Retrieval-Augmented Generation) เป็นเทคนิคที่ช่วยให้ LLM (large language model) ตอบคำถามได้แม่นยำขึ้น และไม่ถูกจำกัดด้วย knowledge cutoff หรือความรู้ที่จำกัดจากตอน train model

    RAG ทำงานใน 2 ขั้นตอน:

    1. Retrieve: ดึงเอกสารที่เกี่ยวข้อง
    2. Generate: สร้างคำตอบจากเอกสารที่ได้มา

    RAG มีข้อดี 3 ข้อ:

    1. คำตอบมีความแม่นยำมากขึ้น
    2. คำตอบมีความเกี่ยวข้องกับคำถามมากขึ้น
    3. ช่วยอัปเดตความรู้ให้กับ LLM ได้โดยไม่ต้อง train model ใหม่

    ในบทความนี้ เราจะมาดูวิธีการสร้าง RAG pipeline ด้วย LangChain ซึ่งเป็น framework ในการพัฒนาแอปพลิเคชัน LLM กัน

    ถ้าพร้อมแล้ว ไปเริ่มกันเลย


    🔆 Overview

    เราใช้ LangChain สร้าง RAG pipeline ได้ใน 5 ขั้นตอน

    1. Load documents
    2. Split text
    3. Embed and store chunks
    4. Create a retriever
    5. Generate a response

    เราไปดูการสร้าง RAG pipeline กับตัวอย่างบอทตอบคำถามเกี่ยวกับนโยบาย HR เช่น การลาและสวัสดิ กัน


    📑 Step 1. Load Documents

    ในขั้นแรก เราจะโหลดเอกสารที่เป็นข้อมูลของ RAG pipeline ก่อน

    LangChain มีหลาย functions สำหรับโหลดเอกสาร เช่น:

    FunctionDocument
    TextLoader()Text file
    UnstructuredMarkdownLoader()Markdown file
    CSVLoader()CSV file
    JSONLoader()JSON file
    PyPDFLoader()PDF file
    DirectoryLoader()ไฟล์จากในโฟลเดอร์

    ในตัวอย่าง เราจะใช้ DirectoryLoader() เพราะเราเก็บเอกสารไว้ในโฟลเดอร์ชื่อ documents:

    documents/
    ├── benefits_policy.txt
    ├── compensation_policy.txt
    ├── leave_policy.txt
    └── remote_work_policy.txt

    ตัวอย่างข้อมูลในเอกสาร benefits_policy.txt:

    DataWise Co. Benefits Policy
    Full-time employees receive health insurance after completing probation.
    The company provides annual health checkups once per year.
    Employees can claim up to 2,000 THB per month for wellness activities such as fitness memberships, yoga classes, or mental health support.
    Employees are also eligible for learning support. The company reimburses up to 10,000 THB per year for approved online courses, books, or professional certificates.

    วิธีใช้ DirectoryLoader():

    Python
    # Import packages
    from langchain_community.document_loaders import DirectoryLoader
    from langchain_community.document_loaders import TextLoader
    # Initialise loader
    loader = DirectoryLoader(
    path="documents",
    glob="*.txt",
    loader_cls=TextLoader,
    loader_kwargs={"encoding": "utf-8"}
    )
    # Load documents
    docs = loader.load()

    การใช้งาน DirectoryLoader():

    • path = โฟลเดอร์ที่ต้องการโหลด
    • glob = pattern ชื่อไฟล์ที่ต้องการโหลด (เช่น "*.txt" หมายถึง ไฟล์ที่ลงชื่อด้วย .txt ทั้งหมด)
    • loader_cls = function ที่จะใช้โหลด (เช่น TextLoader())
    • loader_kwargs = argument เพิ่มเติมสำหรับ function ที่จะใช้โหลด

    เราสามารถดูตัวอย่างเอกสารที่โหลดแล้วได้แบบนี้:

    Python
    # View loaded documents
    for doc in docs:
    print("=" * 50)
    print(doc.metadata["source"])
    print("=" * 50)
    print(doc.page_content[:200])

    ผลลัพธ์:

    ==================================================
    documents/remote_work_policy.txt
    ==================================================
    DataWise Co. Remote Work Policy
    Employees may work from home up to 2 days per week.
    Remote work must be approved by the employee's direct manager.
    Employees must be reachable on Slack during core w
    ==================================================
    documents/benefits_policy.txt
    ==================================================
    DataWise Co. Benefits Policy
    Full-time employees receive health insurance after completing probation.
    The company provides annual health checkups once per year.
    Employees can claim up to 2,000 THB
    ==================================================
    documents/compensation_policy.txt
    ==================================================
    DataWise Co. Compensation Policy
    Salary is paid on the last working day of each month.
    Performance bonuses are reviewed once per year in December.
    Employees may receive an annual salary adjustment
    ==================================================
    documents/leave_policy.txt
    ==================================================
    DataWise Co. Leave Policy
    Full-time employees receive 10 days of annual leave per year after completing probation.
    Employees receive 15 days of paid sick leave per year.
    Sick leave of 3 consecutive

    📚 Step 2. Split Text

    ในขั้นที่ 2 เราจะแบ่ง text ในเอกสารออกเป็นก้อน ๆ หรือ chunk เพราะการแบ่ง text จะช่วยให้การค้นหาข้อมูลง่ายขึ้น

    LangChain มี 3 functions หลักในการแบ่ง text:

    FunctionMethod
    CharacterTextSplitter()แบ่งตามจำนวน character ที่กำหนด
    TokenTextSplitter()แบ่งตามจำนวน token ที่กำหนด
    RecursiveCharacterTextSplitter()แบ่งตามย่อหน้า บรรทัด และประโยค

    ในตัวอย่าง เราจะใช้ RecursiveCharacterTextSplitter() เพราะเป็นวิธีที่เก็บรักษาความหมายของ text ได้ดีกว่าวิธีอื่น:

    วิธีใช้ RecursiveCharacterTextSplitter():

    Python
    # Import package
    from langchain_text_splitters import RecursiveCharacterTextSplitter
    # Create splitter
    text_splitter = RecursiveCharacterTextSplitter(
    chunk_size=500,
    chunk_overlap=100
    )
    # Split documents
    chunks = text_splitter.split_documents(docs)

    ดูตัวอย่าง text ที่แบ่งแล้วได้ตามนี้:

    Python
    # View results
    for i, chunk in enumerate(chunks[:5]):
    print(f"Chunk {i+1}")
    print("Source:", chunk.metadata["source"])
    print(chunk.page_content)
    print("-" * 50)

    ผลลัพธ์:

    Chunk 1
    Source: documents/remote_work_policy.txt
    DataWise Co. Remote Work Policy
    Employees may work from home up to 2 days per week.
    Remote work must be approved by the employee's direct manager.
    Employees must be reachable on Slack during core working hours from 10:00 AM to 4:00 PM.
    Employees working remotely are responsible for maintaining a stable internet connection and a quiet work environment.
    New employees may request remote work only after completing their first month.
    --------------------------------------------------
    Chunk 2
    Source: documents/benefits_policy.txt
    DataWise Co. Benefits Policy
    Full-time employees receive health insurance after completing probation.
    The company provides annual health checkups once per year.
    Employees can claim up to 2,000 THB per month for wellness activities such as fitness memberships, yoga classes, or mental health support.
    Employees are also eligible for learning support. The company reimburses up to 10,000 THB per year for approved online courses, books, or professional certificates.
    --------------------------------------------------
    Chunk 3
    Source: documents/compensation_policy.txt
    DataWise Co. Compensation Policy
    Salary is paid on the last working day of each month.
    Performance bonuses are reviewed once per year in December.
    Employees may receive an annual salary adjustment based on company performance, individual performance, and market benchmarks.
    Overtime pay is available only for non-managerial employees and must be approved by a manager before the overtime work begins.
    --------------------------------------------------
    Chunk 4
    Source: documents/leave_policy.txt
    DataWise Co. Leave Policy
    Full-time employees receive 10 days of annual leave per year after completing probation.
    Employees receive 15 days of paid sick leave per year.
    Sick leave of 3 consecutive days or more requires a medical certificate.
    Employees should submit annual leave requests at least 7 days in advance through the HR system.
    Unused annual leave can be carried over for up to 5 days into the next calendar year.
    --------------------------------------------------

    สังเกตว่า text ถูกแบ่งย่อหน้า ทำให้ chunk ที่ได้มีความหมายที่ครบถ้วนในตัวเอง


    💾 Step 3. Embed & Store Chunks

    ในขั้นที่ 3 เราจะ embed และเก็บข้อมูลลงใน vector database

    Embedding คือ การแปลง chunk ให้กลายเป็น vector คือ ชุดตัวเลขที่เป็นตัวแทนของ chunk

    ตัวอย่าง chunk:

    "Employees can work from home up to two days per week."

    ตัวอย่าง vector:

    [
    0.021,
    -0.184,
    0.736,
    0.094,
    -0.511,
    0.302,
    0.087,
    -0.624
    ]

    Vector เป็นสิ่งที่ระบบจะใช้ในการค้นหาเอกสารที่เกี่ยวข้อง โดย vector ที่มีความหมายใกล้เคียงกัน จะมีตัวเลขที่ใกล้เคียงกัน เมื่อเราต้องการหาเอกสาร ระบบจะดึงเอกสารที่มี vector ใกล้เคียงกับคำถามของเราขึ้นมาให้

    ใน LangChain เราสามารถเลือก model ที่จะใช้ embedding ได้ ในตัวอย่าง เราจะใช้ Gemini กัน:

    Python
    # Import packages
    import os
    from langchain_google_genai import GoogleGenerativeAIEmbeddings
    # Get API key
    GEMINI_API_KEY = os.getenv("GEMINI_API_KEY")
    # Create embedder
    document_embedder = GoogleGenerativeAIEmbeddings(
    model="gemini-embedding-001",
    task_type="retrieval_document",
    google_api_key=GEMINI_API_KEY
    )

    หลังจากได้ embedding model แล้ว เราจะสร้าง vector database เพื่อเก็บ vector โดยในตัวอย่างเราจะใช้ FAISS database:

    Python
    # Import package
    from langchain_community.vectorstores import FAISS
    # Build vector DB
    vectorstore = FAISS.from_documents(
    documents=chunks,
    embedding=document_embedder
    )

    สังเกตว่า เราใส่ document_embedder ไปใน vector database ด้วย เพื่อแปลง chunk เป็น vector และเก็บลงใน database


    🔎 Step 4. Create a Retriever

    ในขั้นที่ 4 เราจะสร้าง retriever ที่ทำหน้าที่ค้นหา vector โดยใช้ .as_retriever() แบบนี้:

    Python
    # Creater retriever
    retriever = vectorstore.as_retriever(
    search_type="similarity",
    search_kwargs={"k": 2}
    )

    เราสามารถทดสอบ retriever เพื่อดูว่า จะได้เอกสารอะไรกลับมา ได้แบบนี้:

    Python
    # Test retriever
    question = "Do I need a medical certificate for sick leave?"
    relevant_docs = retriever.invoke(question)
    for i, doc in enumerate(relevant_docs, start=1):
    print(f"Retrieved chunk {i}")
    print("Source:", doc.metadata["source"])
    print(doc.page_content)
    print("-" * 60)

    ผลลัพธ์:

    Retrieved chunk 1
    Source: documents/leave_policy.txt
    DataWise Co. Leave Policy
    Full-time employees receive 10 days of annual leave per year after completing probation.
    Employees receive 15 days of paid sick leave per year.
    Sick leave of 3 consecutive days or more requires a medical certificate.
    Employees should submit annual leave requests at least 7 days in advance through the HR system.
    Unused annual leave can be carried over for up to 5 days into the next calendar year.
    ------------------------------------------------------------
    Retrieved chunk 2
    Source: documents/compensation_policy.txt
    DataWise Co. Compensation Policy
    Salary is paid on the last working day of each month.
    Performance bonuses are reviewed once per year in December.
    Employees may receive an annual salary adjustment based on company performance, individual performance, and market benchmarks.
    Overtime pay is available only for non-managerial employees and must be approved by a manager before the overtime work begins.
    ------------------------------------------------------------

    🤖 Step 5. Generate a Response

    ในขั้นสุดท้าย เราจะให้ LLM สร้างคำตอบโดยใช้ข้อมูลใน vector database

    ในตัวอย่างเราจะลองใช้ Gemini ช่วยคิดคำตอบให้กับเรา

    เราจะเริ่มจากเชื่อมต่อกับ Gemini และสร้าง prompt ก่อน:

    Python
    # Import packages
    from langchain_google_genai import ChatGoogleGenerativeAI
    from langchain_core.prompts import ChatPromptTemplate
    # Initialise Gemini
    llm = ChatGoogleGenerativeAI(
    model="gemini-2.5-flash",
    temperature=0,
    google_api_key=GEMINI_API_KEY
    )
    # Create prompt template
    prompt = ChatPromptTemplate.from_template("""
    You are an HR policy assistant.
    Answer the user's question using only the policy context below.
    Rules:
    - Do not use outside knowledge.
    - If the answer is not in the context, say:
    "I could not find this information in the available company policies."
    - Keep the answer concise.
    - Mention the source policy file when possible.
    Policy context:
    {context}
    User question:
    {question}
    """)

    จากนั้น กำหนดคำถามและดึงเอกสารที่เกี่ยวข้องจาก vector database

    Python
    # Ask a question
    question = "Do I need a medical certificate for sick leave?"
    # Retrieve relevant document chunks
    relevant_docs = retriever.invoke(question)
    # Combine retrieved chunks into one context string
    context = "\n\n".join(
    [
    f"Source: {doc.metadata['source']}\n"
    f"{doc.page_content}"
    for doc in relevant_docs
    ]
    )
    # Inspect retrieved context before sending it to Gemini
    print("Retrieved context:")
    print(context)

    ผลลัพธ์:

    Retrieved context:
    Source: documents/leave_policy.txt
    DataWise Co. Leave Policy
    Full-time employees receive 10 days of annual leave per year after completing probation.
    Employees receive 15 days of paid sick leave per year.
    Sick leave of 3 consecutive days or more requires a medical certificate.
    Employees should submit annual leave requests at least 7 days in advance through the HR system.
    Unused annual leave can be carried over for up to 5 days into the next calendar year.
    Source: documents/compensation_policy.txt
    DataWise Co. Compensation Policy
    Salary is paid on the last working day of each month.
    Performance bonuses are reviewed once per year in December.
    Employees may receive an annual salary adjustment based on company performance, individual performance, and market benchmarks.
    Overtime pay is available only for non-managerial employees and must be approved by a manager before the overtime work begins.

    แล้วส่งข้อมูลคำถามและเอกสารให้กับ Gemini:

    Python
    # Add context and question to prompt template
    messages = prompt.invoke(
    {
    "context": context,
    "question": question
    }
    )
    # Send prompt to Gemini
    response = llm.invoke(messages)
    # Print Gemini's answer
    print(response.content)

    ผลลัพธ์:

    Yes, sick leave of 3 consecutive days or more requires a medical certificate. (Source: documents/leave_policy.txt)

    เพื่อให้เราใช้งาน RAG pipeline ได้ง่าย เราสามารถแปลงโค้ดชุดนี้ให้เป็น function ได้:

    Python
    # Convert to function
    def ask_policy_question(question: str) -> str:
    """
    Retrieve relevant policy chunks, send them to Gemini,
    and return Gemini's answer.
    """
    # Retrieve relevant chunks
    relevant_docs = retriever.invoke(question)
    # Combine retrieved chunks into context
    context = "\n\n".join(
    [
    f"Source: {doc.metadata['source']}\n"
    f"{doc.page_content}"
    for doc in relevant_docs
    ]
    )
    # Add context and question to prompt template
    messages = prompt.invoke(
    {
    "context": context,
    "question": question
    }
    )
    # Send completed prompt to Gemini
    response = llm.invoke(messages)
    # Return answer text
    return response.content

    เพื่อที่เราจะเขียนโค้ดสั้นลงในครั้งถัด ๆ ไป:

    Python
    # Test function
    answer = ask_policy_question("Who is eligible for health insurance?")
    print(answer)

    ผลลัพธ์:

    Full-time employees receive health insurance after completing probation. (Source: documents/benefits_policy.txt)

    💪 Summary

    ในบทความนี้ เราได้เรียนรู้การสร้าง RAG pipeline ด้วย LangChain ใน 5 ขั้นตอน:

    1. Load documents: โหลดเอกสารสำหรับ RAG pipeline
    2. Split text: แบ่ง text ในเอกสารเป็น chunk
    3. Embed and store chunks: แปลง chunk เป็น vector และเก็บลงใน database
    4. Create a retriever: สร้างตัวค้นหาเอกสารจาก vector database
    5. Generate a response: สร้างคำตอบจากเอกสาร

    😺 GitHub

    ดูตัวอย่าง code และเอกสารทั้งหมดได้ที่ GitHub


    📃 References